Topics at the Allianz Center for Technology:
Measuring Paint Layer Thickness On Plastic Parts

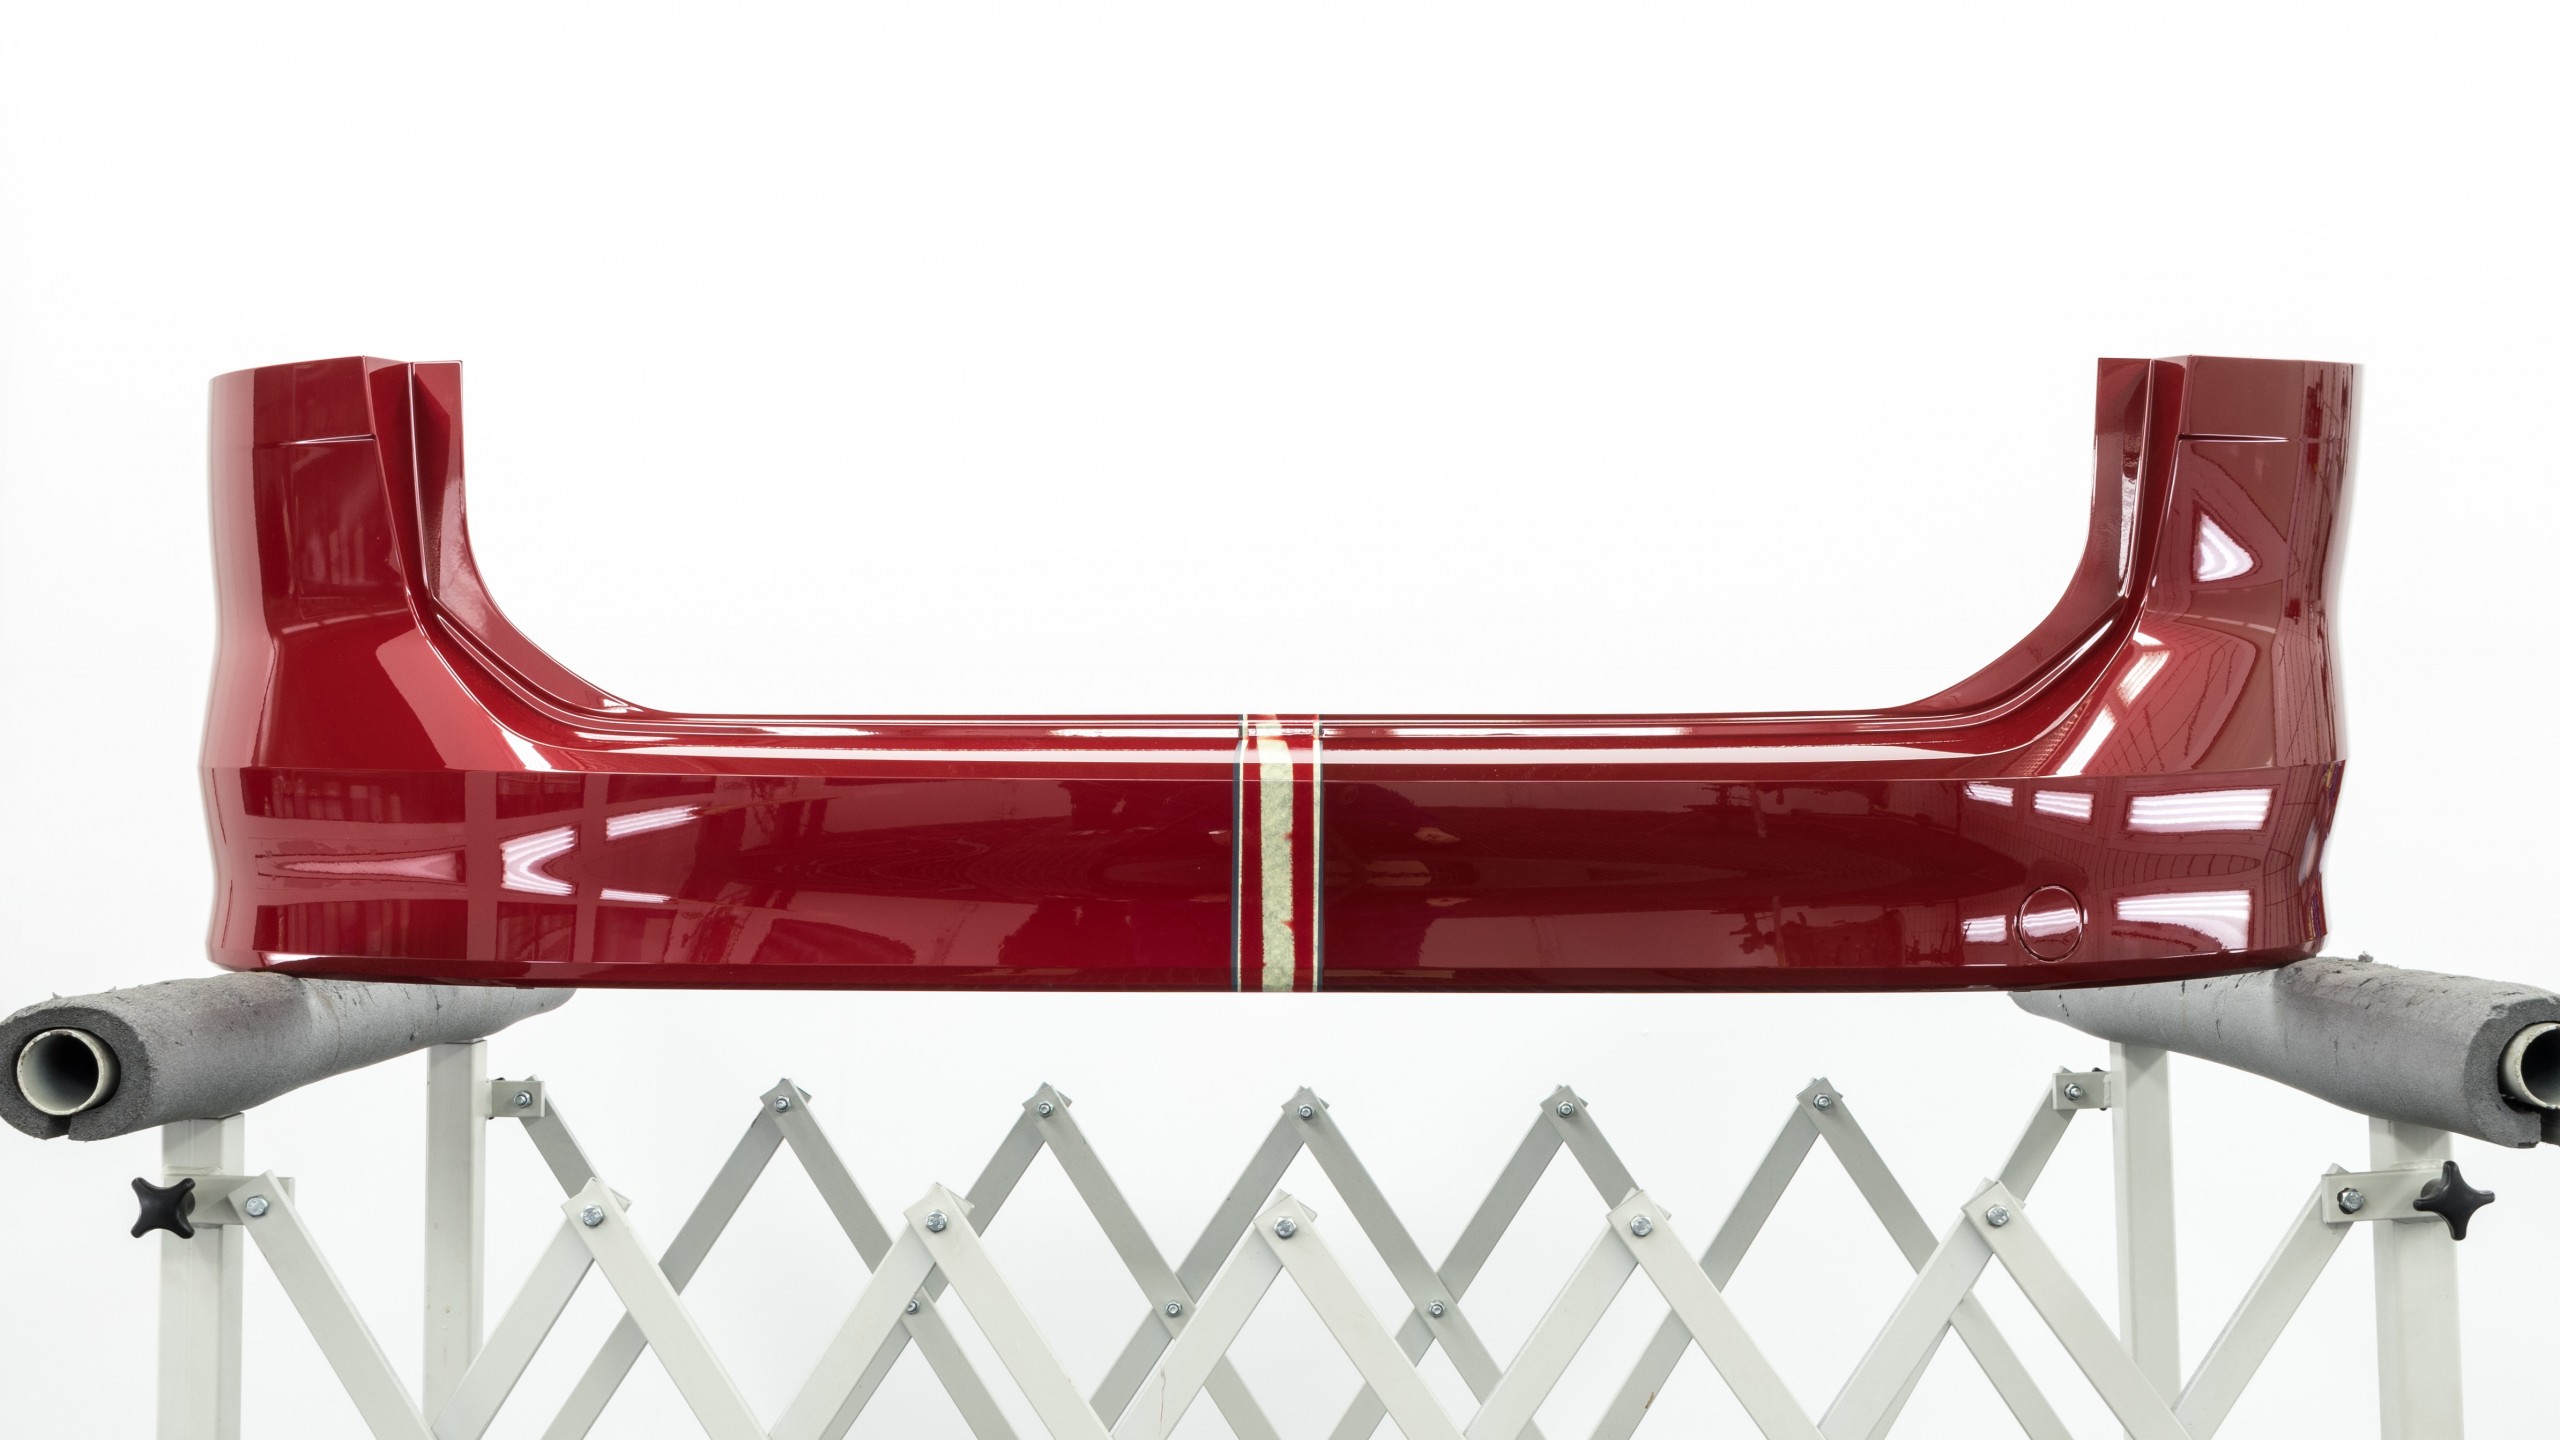
Photo: Rear bumper cover painted in Volkswagen Chili Red (LS3M) using different paint manufacturers on driver’s side (left half of the picture) and passenger’s side (right half of the picture) with clearly recognizable color shade differences when using the standard mixing formulas.
May 2021
More and more vehicles are being equipped with sensors for driver assistance systems, and this is having an increasing impact on the repair of vehicles that have been involved in accidents. Since manufacturers' repair instructions sometimes contain very precise specifications for painting, especially for painted plastic parts, repair shops and paint shops are facing new challenges. In order to be able to document their own working methods in the event of problems arising during sensor calibration and in the event of enquiries, it is necessary, for example, to measure the applied paint layer thicknesses non-destructively. The AZT has carried out extensive studies on this.
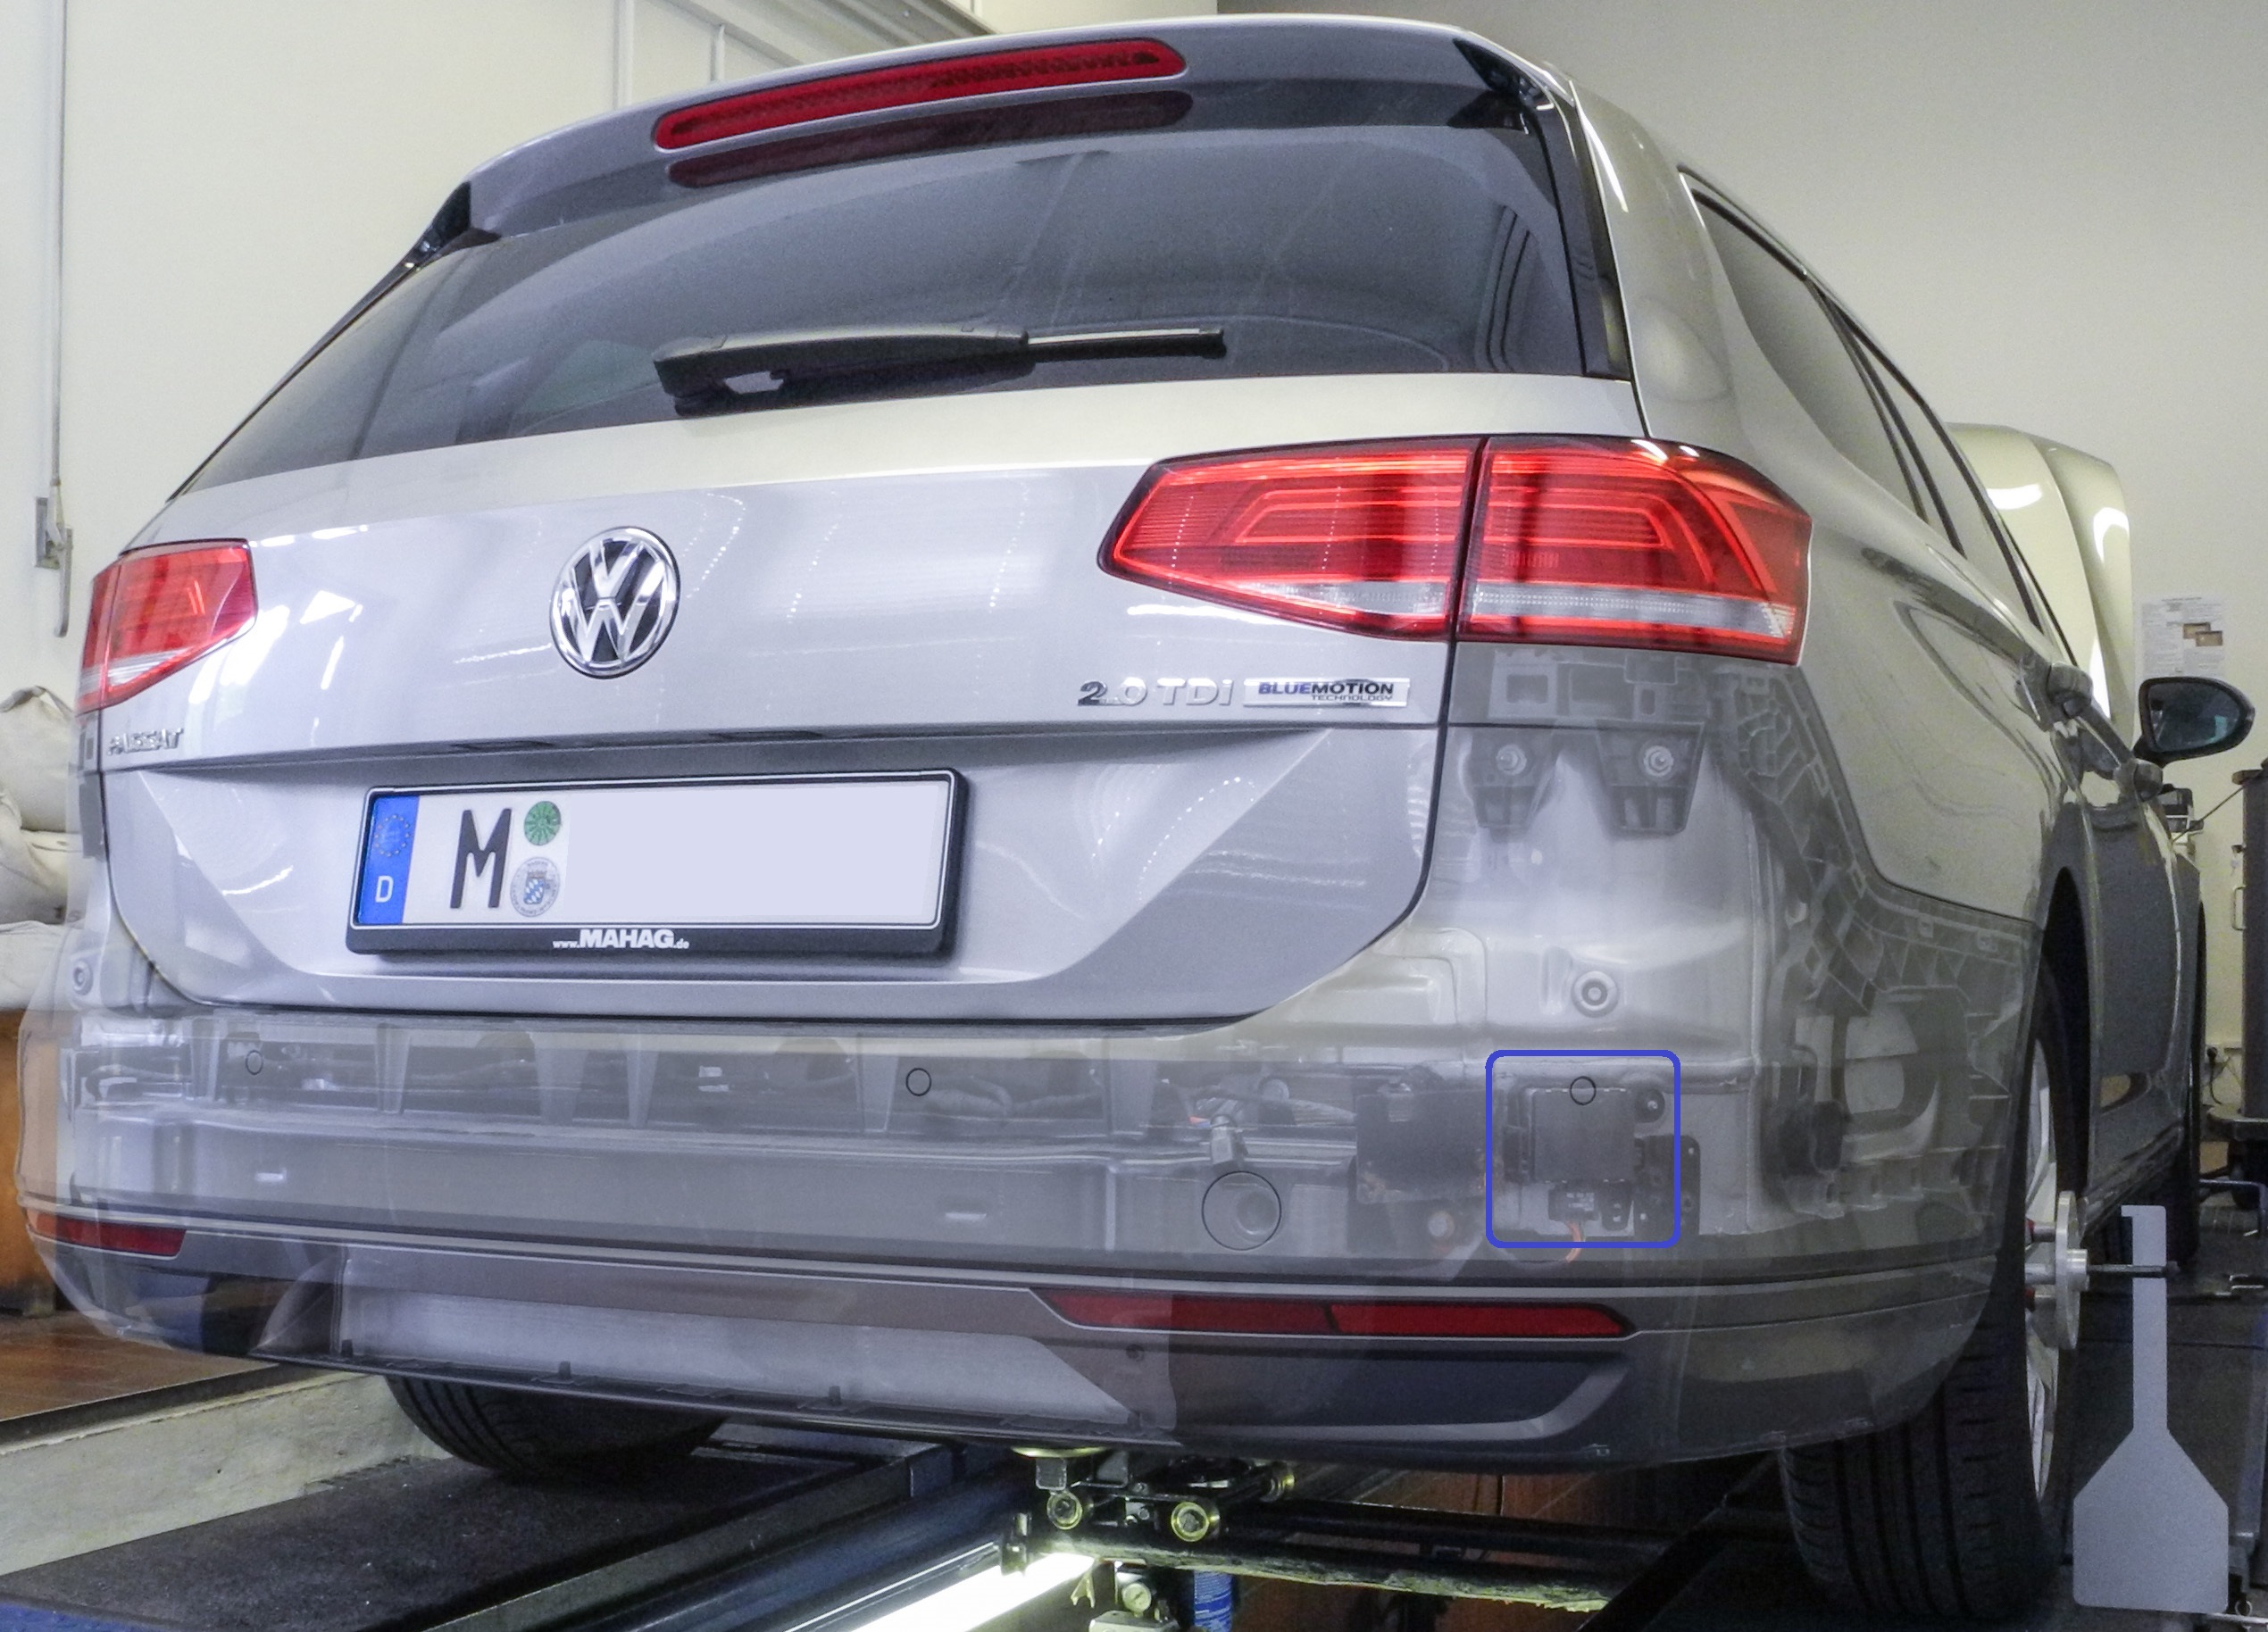
Radar sensors that are required for the functionality of driver assistance systems such as lane change warnings or lane change assistants as well as parking or intersection assistants, are usually installed in areas that are per se at risk of collision behind the bumper trim. Depending on the vehicle manufacturer, the relevant specifications and approvals for the repair and painting of bumper covers must be observed in the event of repairs. This may also include the permissible paint thickness.

Figure 1: Volkswagen Passat Variant (model code: 3C, MJ 2015) with partially transparent rear bumper cover and marking of the passenger’s side radar sensor mounted on the rear panel for monitoring the rear traffic area.
The aim of every repair is to achieve the best result from both an ecological and an economic point of view. Every bumper cover that is unnecessarily renewed from a technical point of view and settled by an insurance company has a negative effect on the type classification due to the associated significantly higher damage costs compared to repair. Ultimately, therefore, the customer always pays the bill, due to rising insurance premiums, if efficient repair options are not available or are not applied.
The AZT therefore carried out numerous series of experiments to calibrate the rear radar sensors and measure the paint layer thickness on various rear bumper covers. Original spare parts were painted at the AZT, the rear radar sensors were calibrated several times and the paint film thickness was measured or determined using various methods. On the one hand, ultrasonic measurements were carried out on the plastic part itself and on samples cut from it, and conventional thickness measurements were carried out on painted color sample sheets using magnetic induction. The samples taken from the bumper covers were also analyzed under the microscope using polished cross-sections, and these results were used as a reference in the overall evaluation.
The series of tests on radar calibration focused on the painting itself; any repair procedures were not considered. This means that in each case original spare parts were painted by a skilled painting craftsman and paint technician at AZT. This therefore corresponds to a new part painting. Furthermore, additional surface painting was applied in some cases. In addition to the original exterior color of the available Volkswagen Passat, other up-to-date colors of the Volkswagen Group were selected as color tones. The aim was to cover colors that, according to the literature, are critical and less critical for radar penetration, as well as paints with various effect pigments and 2- and 3-layer paints. Furthermore, all bumper covers and corresponding color sample sheets were painted with two different refinishing paint systems from different paint manufacturers, each with the standard mixing formula (driver's side: paint manufacturer A; passenger's side: paint manufacturer B). The clear focus was on analyzing the paint layer thickness in combination with different paint colors, which is why the final coating with clear coat was uniformly applied with a 2K clear coat, since this is technologically comparable for both refinishing paint systems used and the influencing factors could therefore be reduced.
In conclusion, it can be stated that the ultrasonic layer thickness measurement principle on plastic is currently not an unrestrictedly resilient and reliable measurement method in the automotive sector and the everyday workshop routine. In particular, the interpretation of the measurement result is challenging on a complete bumper cover, which can deform when the corresponding compressive force is applied for the ultrasonic measurement. On a buckling-resistant stiff sample, on the other hand, the ultrasonic measurement principle works quite reliably, but then contradicts a non-destructive measurement method. In addition, the selected measuring mode in combination with the respective software version of the ultrasonic measuring device can make a significant difference in the result of the paint layer thickness output. Sometimes more precise results can be achieved with a color sample sheet painted at a suitable location and the conventional coating thickness measurement carried out on it.
In order to be able to evaluate the quality of the measurement results from ultrasonic measurement and the paint layer thickness measurement on metallic substrates using magnetic induction or the eddy current measuring principle, polished cross-sections from samples of the painted bumper covers were evaluated under a scanning electron microscope and the real paint layer thicknesses were determined. It was shown that the deviation of the measurement results on the paint sample sheets from the true paint film layer thickness is minimal and therefore appropriate conclusions can be drawn in everyday's workshop routine, provided that the paint sample sheets were painted in a suitable manner together with the respective components.
A detailed compilation of the scope of the test, the chosen approach and relevant results was recently published in the April 2021 issue of the journal "Verkehrsunfall und Fahrzeugtechnik".
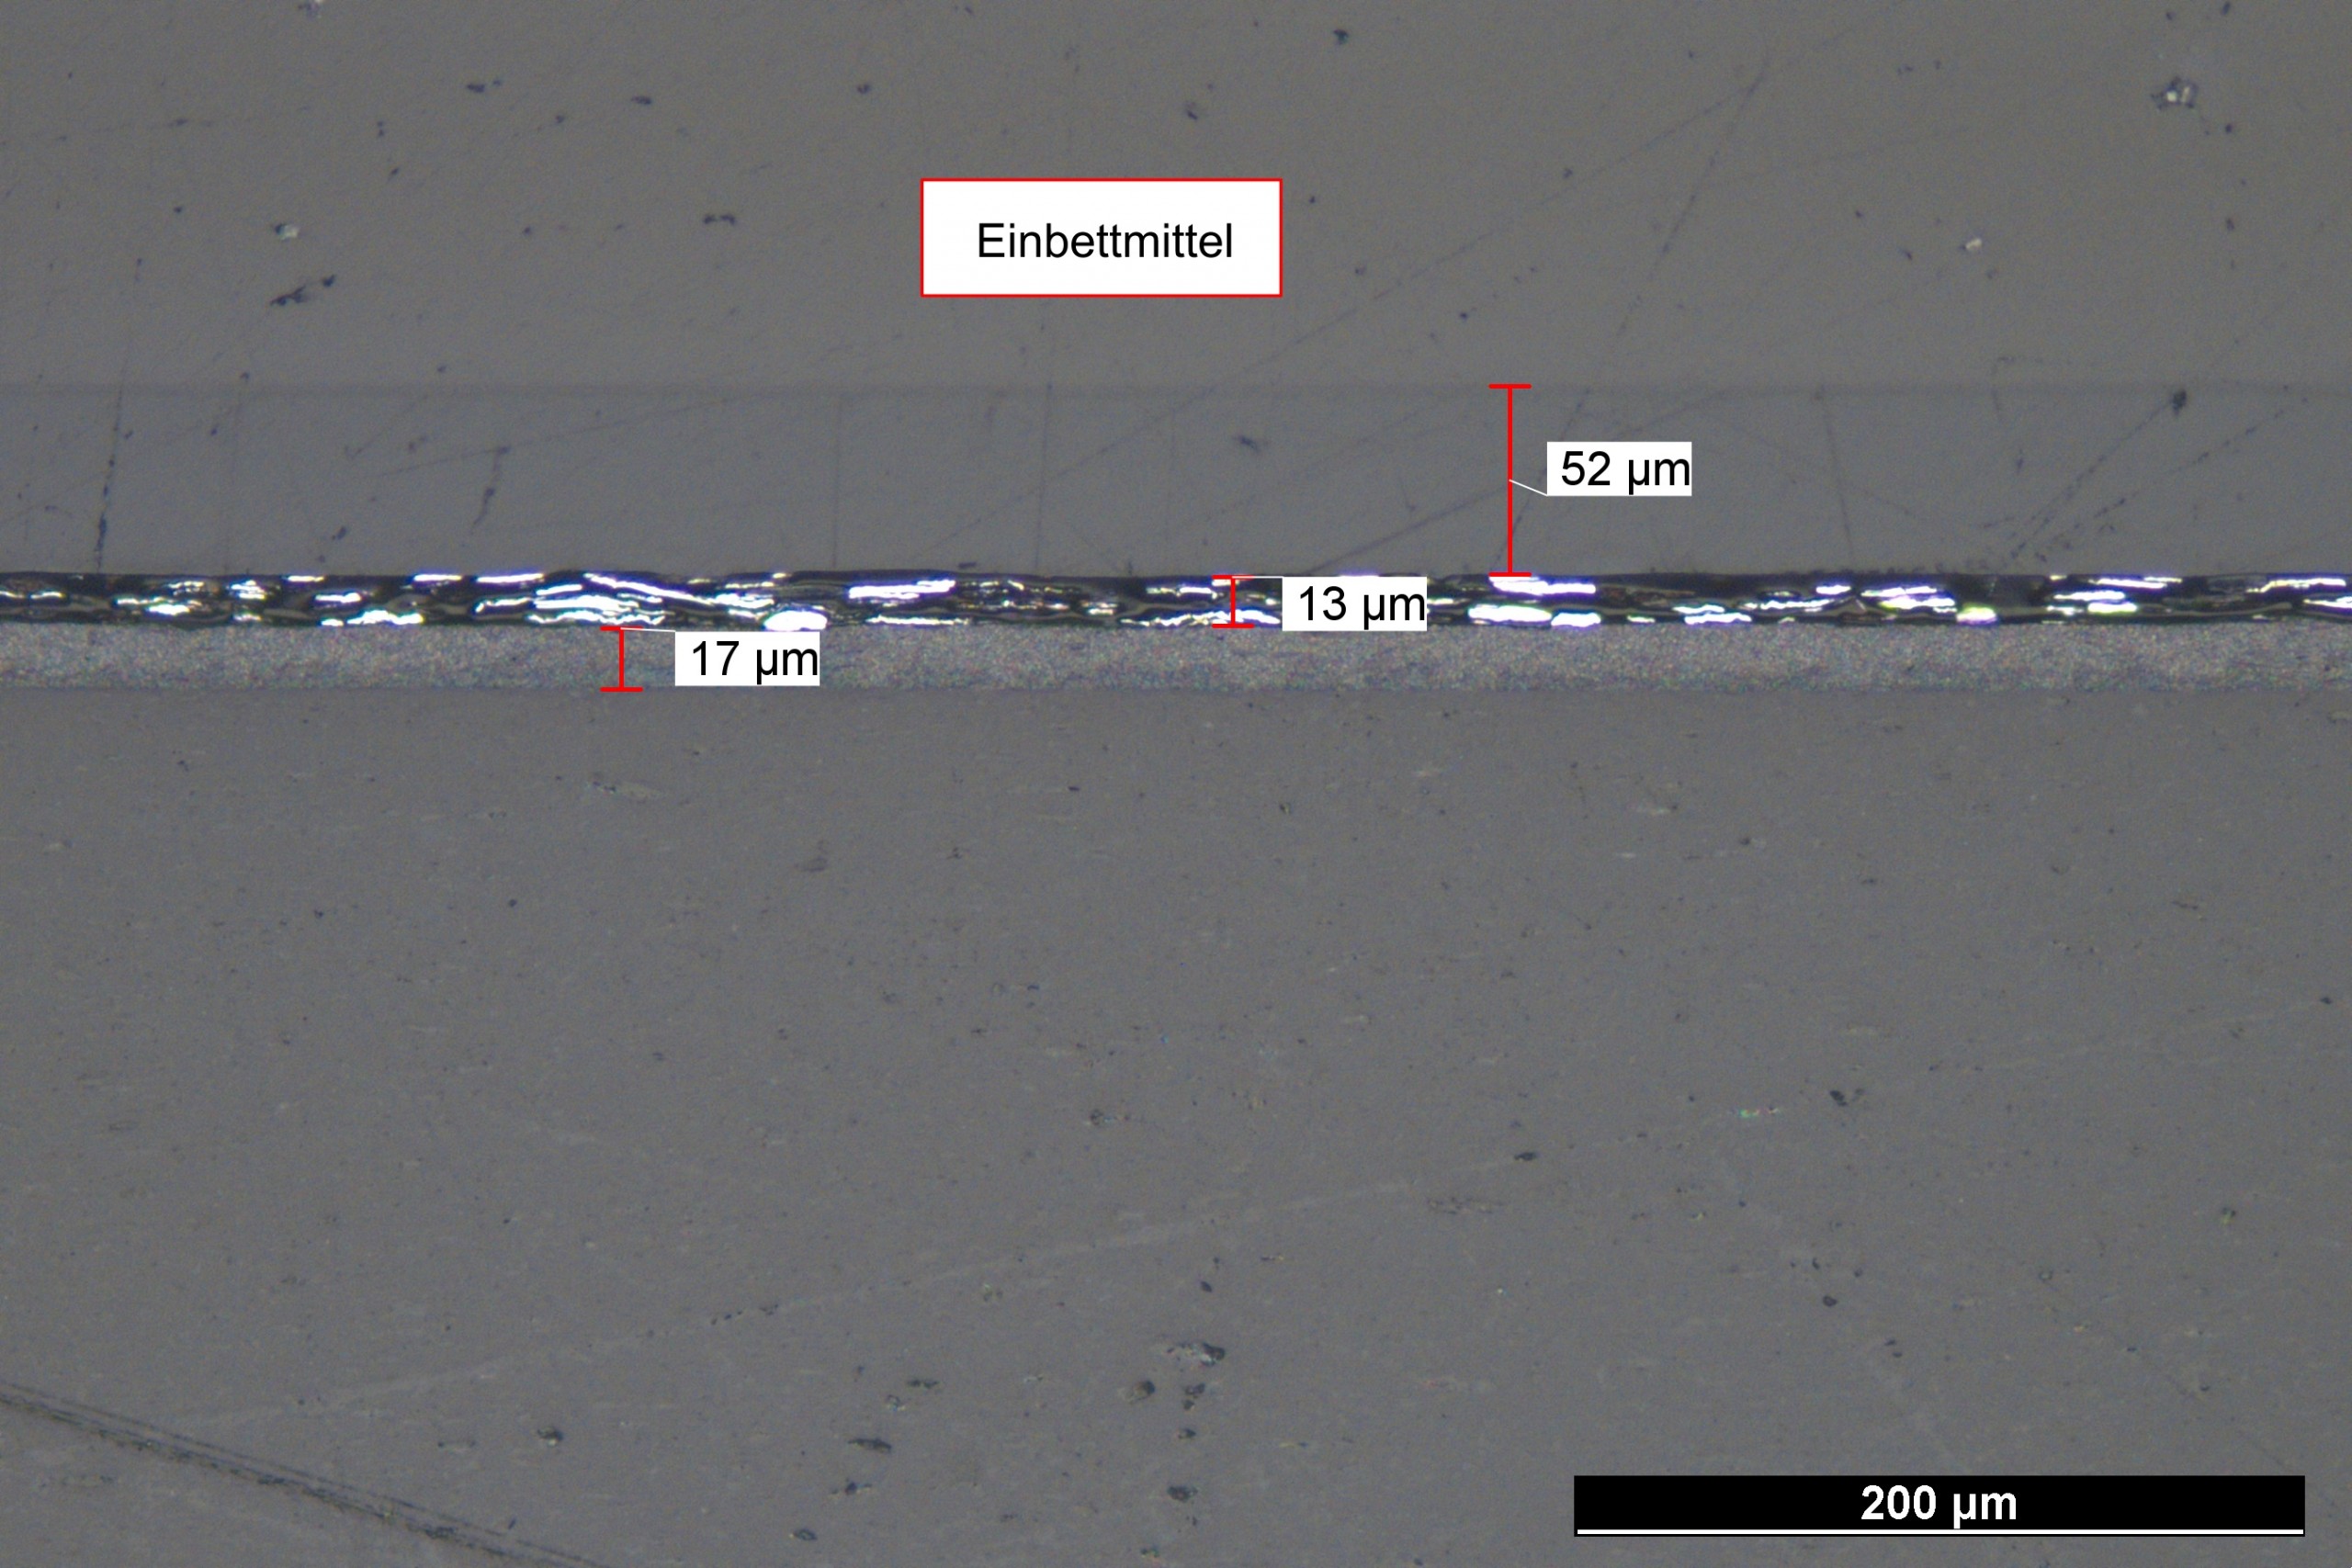
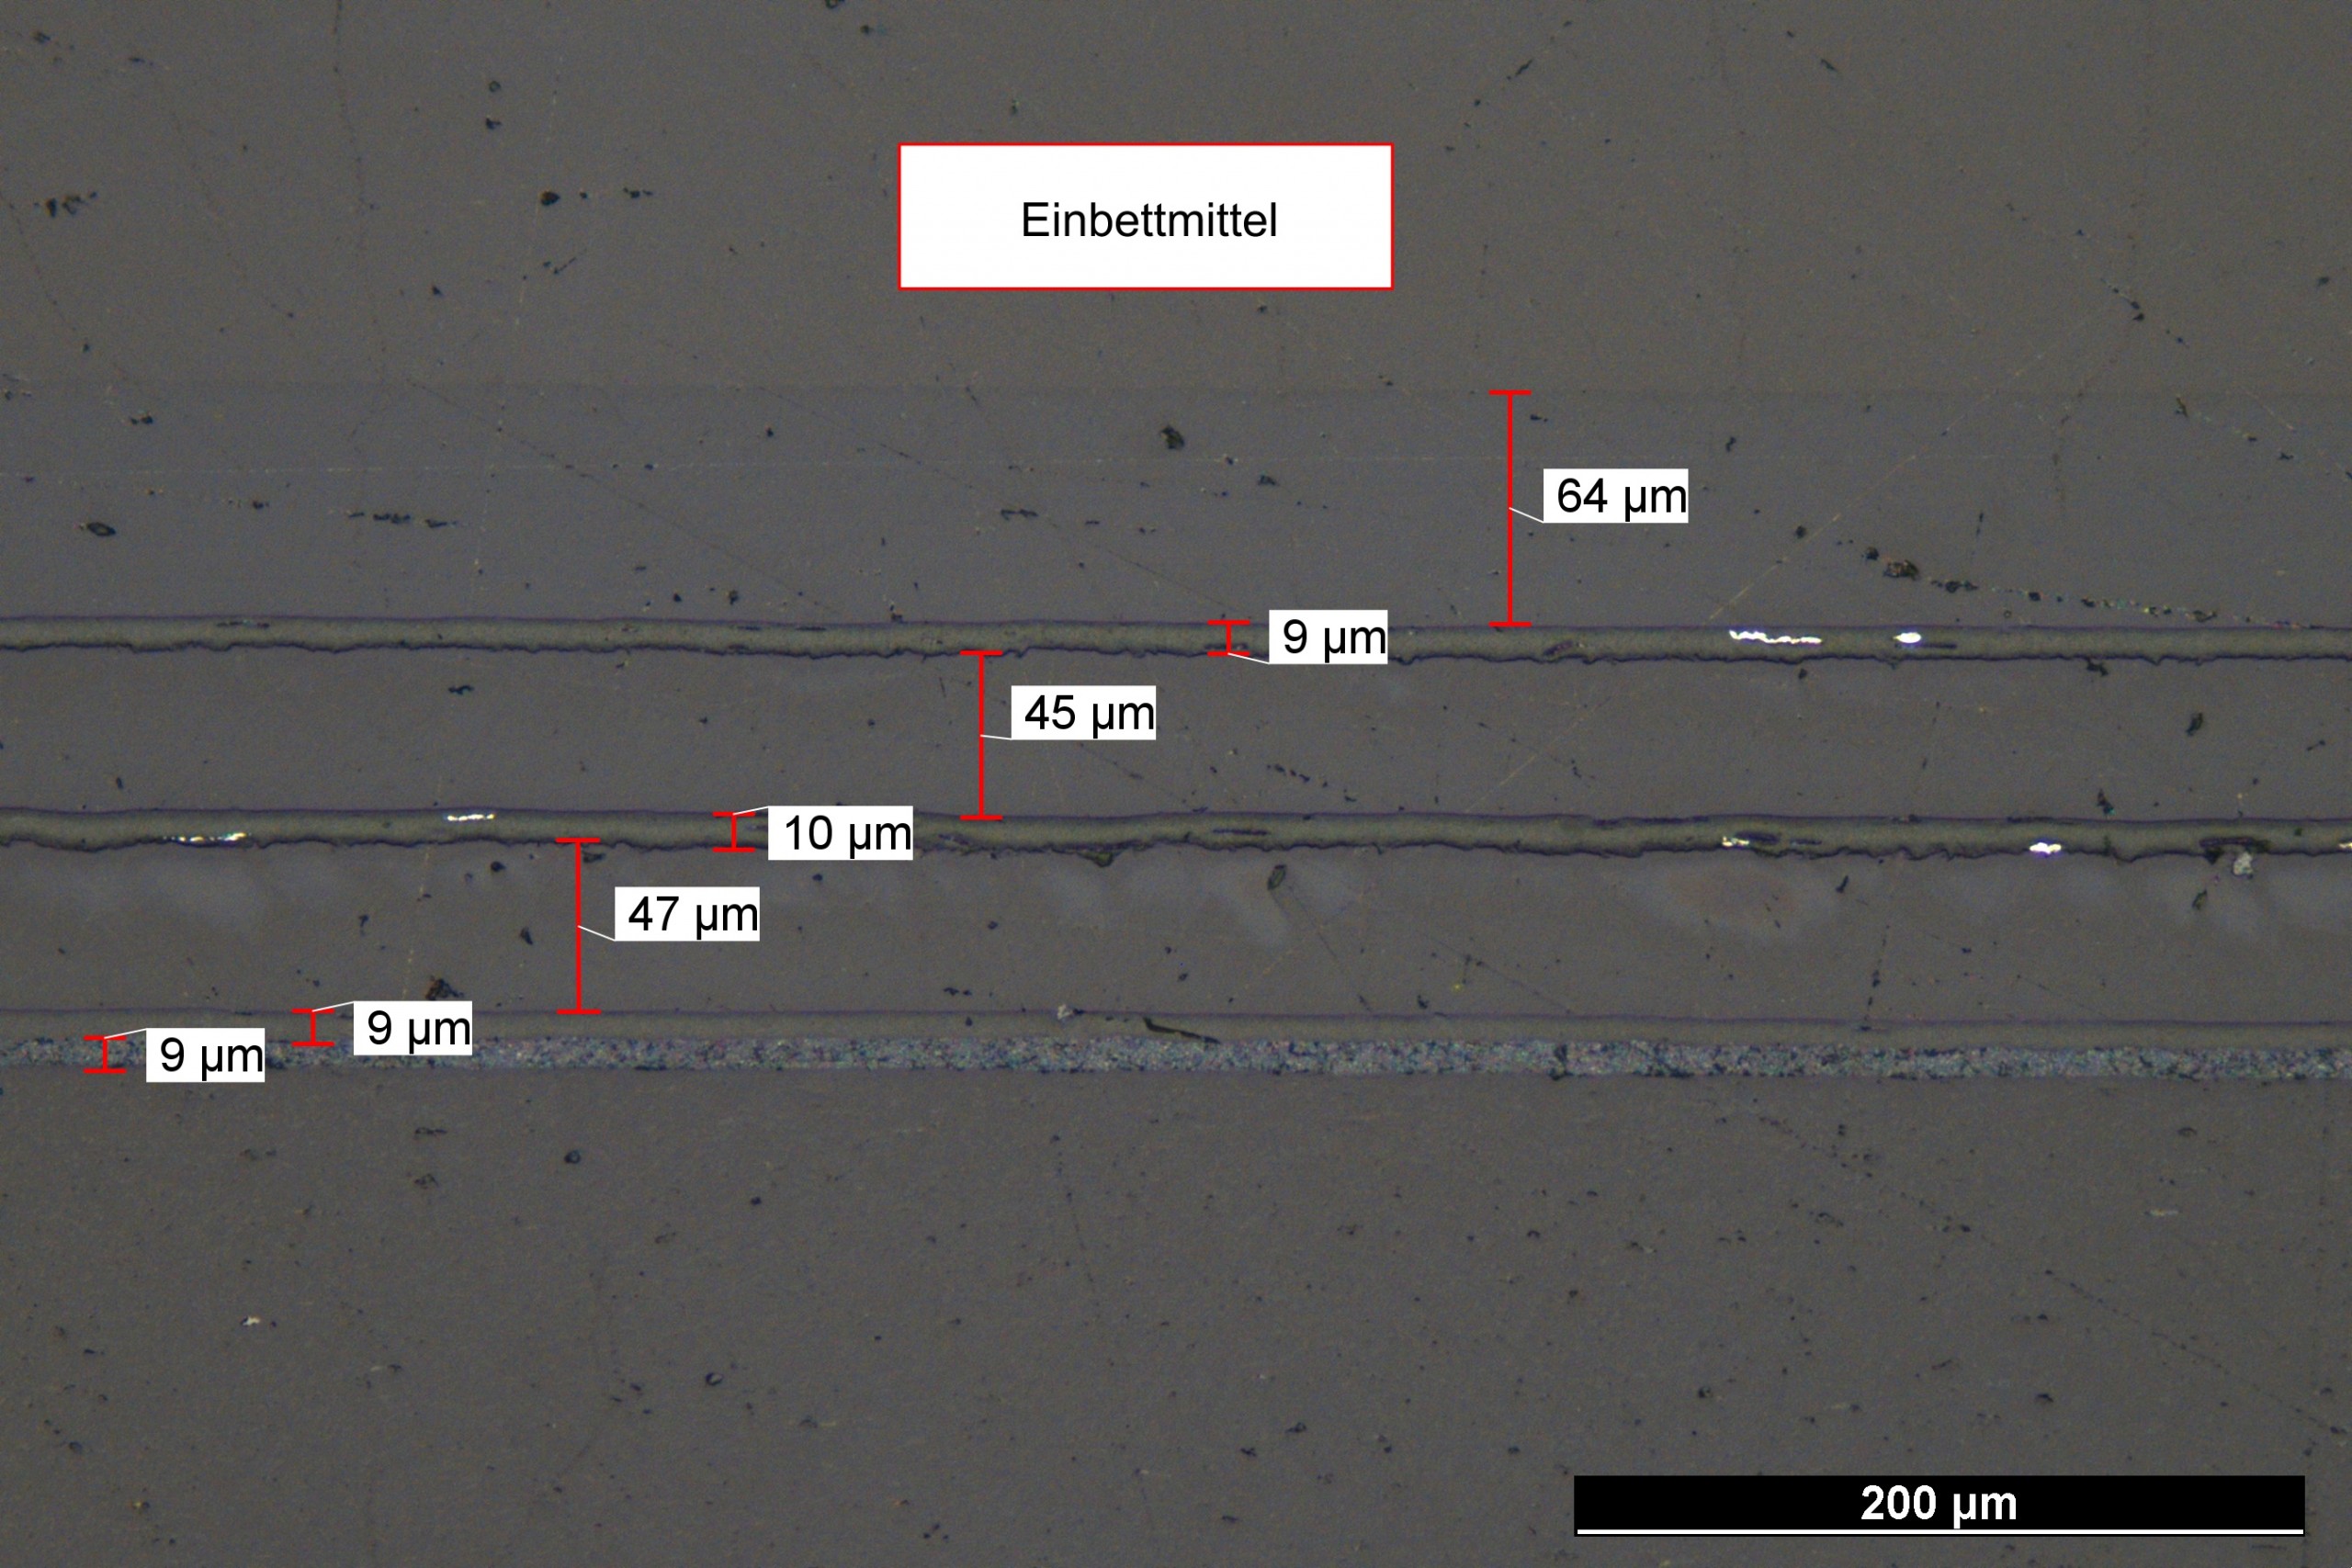
The polished cross-sections taken in the series of tests were mainly used to determine the real coating layer thickness in order to be able to evaluate the various non-destructive measurement methods for paint layer thickness. In addition, the polished cross-sections were used to illuminate further interesting aspects. Figure 2 shows the polished cross-section of a bumper cover painted in Volkswagen Pyrit Silver, on which the very homogeneous distribution of the effect pigments can be seen combined with their uniform orientation. The silver effect pigments are all aligned approximately parallel and bonded in the base coat. This results in a uniform and thin base coat layer thickness, which nevertheless ensures a covering coating. In addition, the polished cross-sections provide an indication of the repeatability of paintwork. An experienced paint specialist who is familiar with the refinishing system used and knows the interactions between the refinishing system and the paint booth as well as its control system can repeat the individual layers of a paintwork with a high degree of accuracy, even with an appropriate offset in time. Figure 3 shows the polished cross-section of a bumper cover that has been painted three times with Volkswagen Deep Black. After the new part painting (base coat & 2K clear coat on primed delivered spare part) and corresponding examinations, a first surface painting with base coat and 2K clear coat followed with corresponding preparation of the painted surface by using fine sanding with sanding pad / fleece. Finally, a second surface coating was applied. All three black base coat layers are almost identical in thickness at 9 – 10 μm. Due to the fine sanding of the existing 2K clear coat surfaces before the new base coat was applied, the first two clear coat layers were each minimally removed and, at 47 μm and 45 μm, are just under a third thinner than the final 2K clear coat layer at 64 μm. It can also be guessed that the surface roughness is increased by sanding, but that the base coat reliably compensates for this and ensures an even surface coating.

Figure 2: Microscope Effect. Polished cross-section of a sample taken from the bumper cover painted in Volkswagen Pyrit Silver showing numerous approximately parallel aligned and evenly distributed effect pigments.

Figure 3: Microscope 3. Polished cross-section of a sample taken from the bumper cover painted in Volkswagen Deep Black with one new part painting and two surface paintings.